Welder Block
| Welder Block | |
|---|---|

| |
| Category: | Functional |
| Function: | a ship tool to construct blocks |
| Fits small grid | |
| Mass: | 448.4 kg |
| Range: | 1.5 m |
| PCU: | 150 |
| Size: | 3x3x6 |
| Time to Build: | 18 sec |
| Fits large grid | |
| Mass: | 713.4 kg |
| Range: | 2.0 m |
| PCU: | 150 |
| Size: | 1x1x2 |
| Time to Build: | 24 sec |
| Data Controls: | [edit] [purge] (?) |
The ![]() Welder Block is a massive, ship-sized version of the handheld Welder tool used when Building blocks. It can be placed on both large and small ships, as well as stations.
Welder Block is a massive, ship-sized version of the handheld Welder tool used when Building blocks. It can be placed on both large and small ships, as well as stations.
Welders are essential in Survival Mode. Welder and Grinder Blocks are often used together on Constructor ships and RC repair drones. Welders are also an essential component of 3D Printers.
Usage
To use the Welder, either turn it on manually in the control panel, or assign its in/off action to a slot in your toolbar.
When it is turned on and in close proximity to an incomplete block, the Welder will first attempt to add components from its inventory to the construction stockpile, and then weld the block up, exactly as a handheld ![]() Welder (Tool) would.
Welder (Tool) would.
How to weld safely
Warning: The welder tip is lethal to players in the area of effect when active!
Operational Space Health Agencies advise adding a Sensor configured to detect the presence of players that automatically deactivates the Welder.
Requirements
For the Welder to work, the components needed for construction progress must be either in the target block's stockpile or in the Welder's inventory. If the Welder is connected to a conveyor system, it can pull components from there.
How to withdraw and deposit components quickly

The Welder supports the Build Planner while you're seated in a cockpit:
 -click unwelded blocks with the Welder from the cockpit to add the missing components to the Build Planner queue.
- Connect to the base and open the Inventory screen.
- Filter the left side to show the welder inventory.
- Filter the right side to show the base's component containers.
- Click the Withdraw button to load the Welder with just the right components.
If you use the Build Planner later to withdraw components for something else, and some components are still in the Welder's internal inventory, then the Welder Block will not release them. So remember to empty the Welder manually when you're done.
To empty the Welder's inventory:
- Connect to the base and open the Inventory screen.
- Filter the left side to show the welder inventory.
- Filter the right side to show component containers.
- Press the Deposit All button.
How to use a welder pit
Several conveyored Welders with overlapping areas of effect are called Welder Wall or Welder Pit. Fly small ships with self-Projectors slowly past the welders to repair them quickly.
Welder Usage Ideas
- Purposefully Welders hidden under e.g. catwalks can be part of lethal player traps.
- Constructor ships are equipped with Welder blocks and possibly Grinder blocks together with cargo containers to speed up welding up large grids in Survival Mode.
- While building a new base, build a temporary Welder Block on any conveyor port next to large unwelded blocks (like Assemblers, Refiners, Jump Drives), and over the next few minutes, the Welder will draw components and weld the blocks in its range. Then grind the Welder down and rebuild it on another conveyor port at the next construction site, and so on.
- A self-Projector combined with strategically placed internal welders makes an internal self-repair system for your ship.
- A welder "hand" on an articulated "arm" of Mechanical Blocks attached to a conveyor system can be used as a repair crane, for example, in a hangar or on a landing pad.
Also look into 3D Printers for grid mass-production.
Troubleshooting
- If the welder gets stuck in the newly built blocks, cover the welder tip with a 3x3 window (or a catwalk floor). The welder's area of effect can go through, but projected blocks will start to be built only where they don't collide with the solid window.
- If your welder stops welding a large project for "no reason", check whether you have exceeded your PCU limit. Many multiplayer servers limit the use of welders per player for performance reasons, so don't just spam them, better share welders with a faction.
- If materials are not pulled in, check all conveyors for completeness, including the not very visible piston/hinge/rotor heads.
Range
Range of effect of the welder is 3 small blocks (1.5 m) on small ships and 4 small blocks (2.0m) on a large ships and stations. The range is spherical and centered roughly on the welding tip.
Power
The Welder requires 2 kW of power while running, regardless of the ship or station it is attached to. It uses the same power whether it has work to do or not.
Inventory
The Welder has an inventory with a capacity of 3,375 L on small ships and 15,625 L on large ships. The inventory will only accept component items.
If attached to a conveyor system the block will pull items that it needs for a job from the network. On small ships, consider that many components can only be conveyored via large conveyor ports and tubes.
Gallery
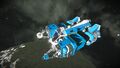
A player-controlled repair ship with both Welder and Grinder.
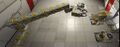
A conveyored welder arm in a hangar ready to repair ships and build projections (image credit: Splitsie)

Construction
The Welder Block exists for large and small grid. It's quite unwieldy as it takes up 2x1x1 blocks space on large ships and 6x3x3 blocks space on small ships. It has mount points on the five sides of its cubic back half. Leave space in front and next to the Welder Block's tip for the area of effect.
It has a large conveyor port on the backside and a small internal inventory. Optimally, you connect it to a conveyor system or cargo containers to store components.
Recipe
| Component | Large Ship/Station Required | Large Ship/Station Optional | Small Ship Required | Small Ship Optional |
|---|---|---|---|---|
| 15 | 5 | 10 | 2 | |
| — | — | 6 | — | |
| 2 | — | 2 | — | |
| 1 | — | — | — | |
| 25 | 5 | 15 | 2 | |
| 2 | — | 2 | — | |