Custom Turret Controller
| Custom Turret Controller | |
|---|---|

| |
| Category: | Functional |
| Fits small grid | |
| Mass: | 250.0 kg |
| Power: | -0.0005 MW |
| PCU: | 100 |
| Size: | 1x1x2 |
| Time to Build: | 10 sec |
| Fits large grid | |
| Mass: | 948.0 kg |
| Power: | -0.0005 MW |
| PCU: | 100 |
| Size: | 1x1x1 |
| Time to Build: | 24 sec |
| Data Controls: | [edit] [purge] (?) |
The Custom Turret Controller (CTC) lets you aim custom turrets and control robot arms or cranes with your mouse. Secondarily, it can automatically aim custom turrets and align solar panels for you. The CTC only makes sense used together with a custom turret: a weapon/tool block on a hinge on a rotor.
Usage

You can control the custom turret or arm manually, or use the game's built-in automatic AI ("artificially intelligent") targeting.
The CTC doesn't do anything on its own. For details on how to build the required turret, see How to build a custom turret first!
Manual versus automatic
When used manually:
- The Controller lets you control a wrist-like movement of a custom subgrid "arm" with your mouse.
- The Controller lets you activate blocks by mouse click:
- Any static Block Weapons
- Any Block Tools such as drills, welders, grinders
- Searchlights (spotlights)
- Observation cameras
- Magnetic Landing Gear, Collectors, Connectors and more...
In automatic mode:
- The AI can aim block tools at chosen targets (stations, ships, players)
- The AI can lock block weapons on to specific subsystems (weapons, propulsion, or power).
From the Automaton update on, while flying/driving, the pilot is able to take manual control of a Custom Turret with the mouse, and still steer the ship/rover with the WASD keys, just as when controlling Block Weapons.
Pros and cons
Advantages of CTC:
- You can build a custom turret out of any blocks (weapons or tools) you like, even multiple together.
- A CTC is best for performing wrist-like movements with one hinge and one rotor.
Disadvantages of CTC:
- Custom turrets are bulkier and have more weak points than vanilla block weapons.
- Custom turrets are much slower to build and repair, because projectors and 3D Printers cannot project grids with rotor/hinge subgrids.
- If you want to combine more than two mechanical blocks, or pistons, you still need to either configure the Tool Bar or use a script.
Control Panel Screen
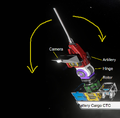
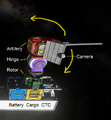
You use either a camera or a block weapon or block tool for AI aiming.
- Assigned Azimuth Rotor - Select the Rotor that turns left/right.
- Assigned Elevation Rotor - Select the Hinge that turns up/down.
- Assigned Camera - (Optional) Select the Camera.
- Available Tools and Weapons - (Optional) Select a tool or weapon and click Add Tool or Weapon to make the CTC control it.
- Selected Tools and Weapons - (Optional) Select a tool or weapon and click Remove Tool or Weapon to make the CTC stop controlling it.
- (If AI is enabled only) Click Set up Actions.
- To the first slot, assign the action that triggers when the AI detects its target.
- To the second slot, assign the action that triggers when the AI detects no target.
- (For solar tracking only) Enable always aim at sun to make the turret's camera follow the sun.
- Keep Enable AI switched off for manual control, or switch it on for automatic AI aiming behaviour.
- Azimuth velocity multiplier -- How fast it turns. Default is 9.0.
- Elevation velocity multiplier -- How fast it tilts. Default is 9.0.
- Angle deviation -- How tolerant the automatic aiming should be. Default is 5.0.
Gallery
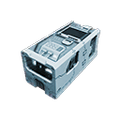
The small-grid variant of the Custom Turret Controller Block
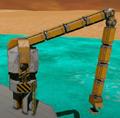
A crane with mag plate grabber is a civilian example of a custom turret. (Image credit: Splitsie)
A turret optimised to defend a spaceship hull without shooting at the hull
A turret optimised to defend a terrestrial station against attackers from the ground
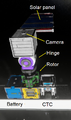
A minimal example of a tracking solar panel with camera aiming
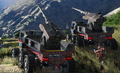
Tanks using an Assault Cannon on hinges and rotors controlled with CTCs
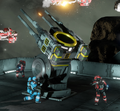
Station defense using multiple Assault Cannons on a hinge and rotor controlled with a CTC


Construction
The Custom Turret Controller block itself takes up 1x1x1 blocks in large-grid and 1x1x2 in small-grid size, with mount points on all sides. The small grid variant has one tiny LCD, and the large grid variant's front console has four LCD Panels that can display scripts, images, or text of your choice.
Using a CTC only makes sense used together with a hinge / rotor construction. The tool on the articulated end can be weapon blocks, or tool blocks, or magnetic landing gear (as a grabber), or gyroscopes, or a camera. Any additional blocks are also allowed. You can build the CTC anywhere on the grid, like a cockpit.
For building details, see How to build a custom turret.
Recipe
| Component | Large Ship/Station Required | Large Ship/Station Optional | Small Ship Required | Small Ship Optional |
|---|---|---|---|---|
| 20 | — | 4 | — | |
| 4 | — | 2 | — | |
| 20 | — | 4 | — | |
| 6 | — | 1 | — | |
| 20 | — | 4 | — | |
| 30 | — | 10 | — | |
| 20 | — | 10 | — | |