Wheel Suspension 1x1
| Wheel Suspension 1x1 | |
|---|---|

| |
| Category: | Mobility |
| Function: | allows steering wheels from cockpit |
| Fits small grid | |
| Mass: | 248 kg |
| Power: | 0.1 MW |
| PCU: | 50 |
| Size: | 1x2x1 |
| Time to Build: | 10 sec |
| Fits large grid | |
| Mass: | 962 kg |
| Power: | 0.5 MW |
| PCU: | 50 |
| Size: | 1x2x1 |
| Time to Build: | 20 sec |
| Data Controls: | [edit] [purge] (?) |
Of all wheel suspension types, the tiny 1x1 wheels are the slowest and they have practically no clearance. Still they make good wheels for compact, slow utility vehicles (such as forklifts), monorails, or shock absorbers for Walker feet. The Wheel Suspension 1x1 exists in an offroad DLC variant as well, with the same properties.
Usage
Add Wheel Suspension blocks to be able to manoeuvre the grid across a planetary surface using the WASD keys and SPACE key. Wheeled vehicles use less power than thrusters, but are more hindered by uneven ground. Make sure to enable the checkbox saying Control Wheels in the Cockpit's Control Panel Screen.
Wheel Suspension Controls
The following controls work consistently only if you've built all suspensions right-side-up.
- Use the WASD keys to drive forwards/backwards and turn left/right
- Press and hold X key to jump. Holding the key makes the suspensions temporarily compress, which can be useful to connect to a low connector or to get through a low entrance. When you then release X key, the suspensions relax which makes the vehicle jump up vertically, which can sometimes be useful to get unstuck from uneven ground.
Tip: Group your wheels on the Control Panel Screen so you can adjust their settings together. You can make several groups, for example, some of the following options apply only to front/back/left/right wheels, while others apply to all of them.
- Add Wheel -- Quickly reattach a missing (unwelded) wheel. Only works if there is enough space next to the suspension!
- Steering -- Whether this wheel should turn left and right when the driver presses A key and D key. Typically, enable this only for front wheels, disable it for all other wheels ("front steering"). For long and slow vehicles, additionally enable it on the back wheels. The turning intensity is controlled by the Steering Angle setting.
- Propulsion -- Whether this wheel should accelerate and decelerate when the driver presses W key and S key. Can be enabled on all wheels. The intensity is controlled by the Power setting.
- Brake -- Whether holding SPACE key engages the handbrake. Disable this for front wheels to prevent flipping!
- Allow Parking Brake -- Whether pressing P key engages the handbrake and other docking actions (see Cockpit Controls). Disable this for front wheels to avoid flipping!
- AirShock -- In case this vehicle catches air, whether it should automatically extend and strengthen its suspensions in mid air to better absorb the shock impact upon landing and prevent damage of the chassis.
- Invert Steering -- Only used if you enable Steer Override, then you must also invert the steering direction of all wheels on the right side.[1]
- Invert Propulsion -- Only used if you enable Propulsion Override, then you must also invert the forward direction of all wheels on the right side.
The following configuration examples describe two extremes, an all-terrain vehicle (ATV) versus a race car:
- Steering Angle in degrees -- When the driver presses A key and D key, how much the wheels should turn. Depends on Steering setting.
- Angle values from 8 to 16 degrees are typical.
- Higher values turn more sharply and will flip a fast vehicle.
- Lower values are safer but result in wider turning circles.
- Power in percent -- When the driver presses the W key or S key keys, how much the vehicle accelerates/decelerates. Depends on Propulsion setting.
- High power values are faster but use up the batteries faster and will cause small vehicles to flip.
- When going uphill, be ready to crank up wheel power temporarily.
- Strength in percent -- How much the suspension resists compressing vertically. You want it to be soft, 5-10%.
- For an all-terrain vehicle, use low values, so that the suspension travels more easily, adjusts smoothly, and keeps traction on uneven terrain.
- For a race car on flat ground, use a higher value so the suspension remains stiff and prevents the vehicle from bottoming-out.
- For a cargo vehicle, adjust this value to not sag when loaded: Increase strength a bit when full, and lower again when empty!
- For vehicles with more than four wheels, give all middle suspensions a lower strength, so they don't lift the other wheels of the ground.
- Height offset in centimetres -- The absolute vertical position of the wheel relative to the suspension.
- For an all-terrain vehicle, you want high clearance, so use a low wheel position such as -32cm.
- For a race car, you want to be close to ground, so you choose a high wheel position, 0 to +32cm.
- Friction in percent -- How much traction (grip) the wheels have on the ground.
- Increase this value while going straight uphill or downhill.
- Decrease this value a bit to be able to turn smoothly.
- For "drifting" on flat ground, or when using Overrides, or when you want to use (gyroscopic) mouse steering, lower wheel friction to have less resistance against the ground.
- Speed Limit in km/h -- Helps you to not accelerate above the chosen value.
- For all-terrain and utility vehicles, impose a low speed to prevent them from flipping.
- For race cars on flat ground, allow higher speeds.
- The vehicle can still exceed this speed when racing downhill, it's not a hard limit.
- Propulsion Override in +/- percent -- Used for Autopiloted vehicles or for cruise control. Use a Timer Block to enable the Autopilot and its Overrides together.
- Steer Override in +/- percent -- Used for Autopiloted vehicles or for cruise control. Use a Timer Block to enable the Autopilot and its Overrides together.
Toolbar Actions for players
When you sit in the cockpit and press G key, then select your custom Wheel Suspensions groups, you have the option to assign the following helpful actions to your quick toolbar slots. Tip: Assign "Reset/Increase/Decrease" actions next to each other to smartly adjust settings on the fly while driving!
- Increase/Decrease Steering Angle -- Lets you change the absolute steering angle on the fly.
- Reset Steering Angle -- Lets you reset the absolute steering angle on the fly.
- Increase/Decrease Power -- Lets you adjust on the fly how fast you'll accelerate, for example, while going uphill.
- Increase/Decrease Strength -- Lets you adjust on the fly how much the suspension travels, for example, when transitioning from flat to uneven terrain.
- Increase/Decrease Height Offset -- Lets you adjust on the fly the wheel clearance, for example, to be able to reach a connector, to fit through a low door, or when transitioning from flat to uneven terrain.
- Reset Height Offset -- Lets you reset wheel clearance on the fly.
- Increase/Decrease Friction -- Lets you adjust the traction on the fly, for example, while going uphill or while racing.
- Increase/Decrease Speed Limit -- Lets you adjust the speed limit on the fly, for example, when transitioning from flat to uneven terrain.
- Increase/Decrease Propulsion Override -- Lets you set up accelerating/decelerating cruise control on the fly.
- Reset Propulsion Override -- Lets you switch off accelerating/decelerating cruise control on the fly.
- Increase/Decrease Steer Override -- Lets you set up the turning cruise control on the fly.
- Reset Steer Override -- Lets you switch off turning cruise control on the fly.
Toolbar Actions for autopilot
You can add the following options to your toolbar, but typically you use them only in Event Controllers, Sensors, and Timer Blocks, in context with Remote Controls.
When you set up an Autopilot sequence, you will enable and disable combinations of the following suspension options using Timer blocks:
- Steering On/Off -- Whether the driver can steer left and right with A key and D key. Deactivate when autopilot takes over.
- Propulsion On/Off -- Whether the driver can accelerate and decelerate with W key and S key. Deactivate when autopilot takes over.
- Can Brake On/Off -- Whether holding SPACEBAR key engages the handbrake. Deactivate if you need the Autopilot to overrule the pilot.
- Allow Parking Brake On/Off -- Whether pressing P key engages the handbrake and other docking actions (see Cockpit Controls).
- AirShock On/Off -- Whether to enable automatic shock absorbers when catching air.
- Invert Steering on/off -- Enable this only on the wheels on the right side while activating Steer Override.
- Invert Propulsion on/off -- Enable this on the wheels on the right side while activating Propulsion Override.
Can the Autopilot drive cars?
Wheeled vehicles cannot properly use the Autopilot function as spaceships do because the Autopilot doesn't turn or propel the wheels. As a workaround, you will have set up Propulsion Overrides to force the vehicle into a sort of cruise control. For details see Autopilot#A_note_on_Autopilot_and_wheeled_vehicles.
Gallery
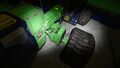
A vanilla wheel suspension: Note the "shock absorber" pushing down.
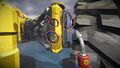
How to orient the Wasteland DLC offroad Wheel suspension: Note the yellow contraption in the suspension shoe is at the top of the device. Yellow hazard triangles also point toward the top of the suspension.
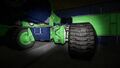
Proper orientation of a wheel suspension. Note the tread placement and J-shaped support on the bottom side of the vehicle.


Construction
The two variants of suspension blocks labeled "right" or "left" only matter for cosmetic purposes. Any wheels will correctly move in the direction of the Remote Control block / Main Cockpit of a vehicle.
Suspensions only attach to grids on the flat side that's opposite the shoe (the place where the wheel meets the suspension). When attaching wheel suspensions, it is important to know which side is up. Choose a well spaced attachment point on the grid, the shoe facing outwards, and determine the proper rotation of the suspension block. The "J" shaped frame is the bottom side. The elbow piston-looking "shock absorber" is the top of the suspension.
After placing a suspension on a grid, the wheel is automatically added at its end. Both Wheel and Suspension must be welded separately to construct them. If no wheel frame appears, first make sure there is enough space for the wheel, then click Add Wheel to restore it.
Tips:
- Additionally adding Gyroscopes to a vehicle enables intuitive turning and levelling (Yaw and Pitch) by moving the mouse.
- Multiple double-layered small wheels have more gripping strength than one big 5x5 wheel suspension; but smaller wheels are slower and their suspensions bottom out much more easily.
- Wheeled constructions that work well in singleplayer need to be tested and tuned again for (laggy) multiplayer.
- The Remote Control's Autopilot cannot control wheels, but a player can remote-control a wheeled vehicle manually.
Recipe
| Component | Large Ship/Station Required | Large Ship/Station Optional | Small Ship Required | Small Ship Optional |
|---|---|---|---|---|
| 6 | — | 1 | — | |
| 12 | — | 2 | — | |
| 6 | — | — | — | |
| 15 | — | 7 | — | |
| 15 | 10 | 5 | 3 | |