How to build a custom turret
The ![]() Custom Turret Controller (CTC) is a great block for building custom turrets, articulated mechanical "arms". Use it to control custom defense turrets, sun-tracking solar panels, drill/repair/ salvage arms, or cranes.
Custom Turret Controller (CTC) is a great block for building custom turrets, articulated mechanical "arms". Use it to control custom defense turrets, sun-tracking solar panels, drill/repair/ salvage arms, or cranes.
The CTC is easy to use and straightforward to set up; neither mods nor scripts are required. Either control the turret or arm manually or use the game's built-in automatic AI ("artificially intelligent") targeting.
Gallery
A turret optimised to defend a spaceship hull without shooting at the hull
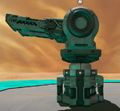
A turret optimised to defend a terrestrial station against attackers from the ground
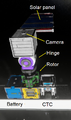
A tracking solar panel
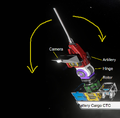
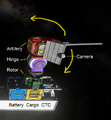
A minimalist custom built turret with Battery, Cargo, Advanced Rotor, Hinge, Artillery, Camera. CTC not visible.
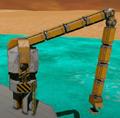
A custom turret controller lets you mouse-control rotation (rotor) and inclination (hinge) of a simple crane. The business end here is a Magnetic Plate to lift things. (Image credit: Splitsie)
A custom turret with large-grid rotor and hinge with a small-grid hinge part holding small-grid weapons (image credit: Splitsie)

Advanced small-grid player-built missile in space: Two orthogonal CTC-controlled rotors carry gyroscopes on zero-RPM override, static weapon for CTC aiming, forward thrusters on override. Idea: Evan


Overview
The CTC block doesn't do anything by itself; it only makes sense when used together with other blocks, as described here. You must build your crane or turret out of blocks so that the "business end" can rotate left-right and tilt up-down. It's the same motion as your head on your neck looking around, or as your hand on your wrist.
In Space Engineers, the blocks that perform these motions are Rotors and Hinges, and they are essential parts of the custom turret. The simplest example is an Advanced Rotor on the bottom, a Hinge on it, with a block weapon on top, and a Camera facing the same way as the weapon.
Whether you place the weapon upright or sideways depends on where you want to aim:
- On a rover or station, your priority is to also aim down from your high ground to defend against ground attacks, so you attach the weapon orthogonally at a 90 degree angle.
- On a spaceship in low gravity, your priority is to not shoot your own ship. Unlike a rover in gravity or a station, you can always turn the whole spaceship towards the attacker, so you attach the weapon block upright to get maximum range.
Putting a Hinge on a Rotor is a good starting point because then the azimuth stays horizontal and the elevation stays vertical relative to the horizon, like your head, which makes it intuitive to control.
(Note: Depending on the purpose of your Custom Turret, the game is not stopping you from putting a rotor on a hinge, or using two hinges, or two rotors! They don't even have to touch one another directly. These variants also work, but make turret control less intuitive for beginners and are not covered here. Experiment by yourself outside the tutorial.)
What is Azimuth? What is Elevation?
In the context of turret control,
- Azimuth means turning left and right horizontally, in a head-shaking motion, like a rotor.
- Elevation means turning up and down vertically, in a head-nodding motion, like a hinge.
How to build the Custom Turret
You can build the main grid (the station, ship, rover, or what ever) and the subgrid turret (or crane, or robot leg, or what ever) out of any blocks, and the business end can be any Block Tool, Block Weapon, or functional block.
If you add Pistons and Magnetic Landing Gears etc., remember that you control them through the toolbar, as usual.
If the Block Weapon needs to pull ammo, or if the Block Tool needs to convey components or ores, connect the turret to the grid's conveyor system by using an Advanced Rotor. Spotlight turrets or magnetic cranes, on the other hand, obviously don't need conveyor access, and can use standard Rotors.
The following minimal example only mentions essential blocks:
- Sit in any cockpit on the grid; open the Control Panel Screen and make it the main cockpit.
- Consider whether you will need to connect the bottom end of the turret to the grid's conveyor system (for ammo etc.) and plan accordingly.
- Build your custom subgrid:
- Build a Rotor and a Hinge for the desired turning motion. (The two blocks don't need to touch each other, but often do.)
- Add desired tools on the moving "business end" of the turret:
- Block Weapons, or
- Block Tools, or
- Gyroscopes, or Magnetic Landing Gear, etc. ...
- Add a Camera with a suitable view direction for manual aiming or solar tracking.
- Build the Custom Turret Controller block.
Next, configure the CTC block.
How to set up the controls
Open the Control Panel Screen of the Custom Turret Controller:
- Under Assigned Azimuth Rotor, select the Rotor (or Hinge) that turns left/right.
- Under Assigned Elevation Rotor, select the (Rotor or) Hinge that turns up/down.
- Under Assigned Camera, select the Camera.
- Add the manual mouse-click functionality, if desired:
- To add block functionality, select one or more entries from Available Tools and Weapons and click Add Tool or Weapon. It will appear under "Selected Tools and Weapons".
- To remove functionality, select the entry under Selected Tools and Weapons and click Remove Tool or Weapon.
- Add automatic block actions, if desired:
- Click Set up Actions.
You'll see two slots where you configure what happens if AI is enabled. - To the first slot, assign a block action (or Timer Block with actions) that triggers when the AI detects its target.
- To the second slot, assign the block action (or Timer Block with actions) that triggers when the AI detects no target.
- (If Camera selected) Enable always aim at sun to make the turret auto-rotate to follow the sun. Used primarily for solar panels, and e.g. rotating custom radar dishes.
- Click Set up Actions.
- Keep Enable AI switched off for manual control, or switch it on for automatic AI aiming behaviour.
How to control turrets manually

If you keep the AI disabled on the Custom Turret Controller's control panel, the turret only moves and shoots when player-controlled.
For manual control, sit in the main cockpit.
- Press G key to open the Toolbar Configuration Screen.
- Under All Blocks,
 -click the "Custom Turret Controller" block, and select Control as function.
This adds manual control of the turret to toolbar slot 1. - Under All Blocks, -click the "Camera" block, and select View as function.
This adds viewing through the turret camera to toolbar slot 2. - Press ESCAPE key to close the Toolbar Configuration Screen.
With the set-up done, now on to how to use it:
- Press your toolbar slot that controls the turret. In this example, press 1 key. Your view changes to the view of the camera.
- Move the mouse left-right and forwards-backwards to control the turret.
- Click to shoot (or to activate the Block tool, respectively).
- Press F key to close the Camera view.
Note: You are still in turret control! If you want back to turret view, activate your Camera View toolbar slot. In this example, press 2 key. - Press F key a second time to leave turret control.
- Press F key a third time to leave the cockpit.
How to set up automatic turret AI
If you activate Enable AI, your custom turret will shoot at chosen targets like a standard automatic turret. You can automatically aim at player characters, large ships, small ships, and so on. For detailed AI targeting options, see How to configure automatic shooting -- block weapons use the same AI settings.
Custom Turrets can also use Target Locking (see there) to benefit from an extended targeting range and autonomous tracking and firing.
How to prevent wobbliness
No matter whether automatic or manual: If aiming moves too sluggishly or too twitchy around one axis, change the Velocity Multipliers. If an automatic turret is much too hesitant or too trigger-happy, adjust Angle Deviation. Thirdly, share the inertia tensors.
Long version:
You find these settings in the Custom Turret Controller's control panel:
- Azimuth velocity multiplier -- How fast it turns. Default is 9.0.
- Increase the value to make the rotor turn faster left/right.
- Decrease the value to between 1.0 and 0 to slow it down.
- Enter negative numbers to invert the turning direction.
- Elevation velocity multiplier -- How fast it tilts. Default is 9.0.
- Increase the value to make the Hinge tilt faster up/down.
- Decrease the value to between 1.0 and 0 to slow it down.
- Enter negative numbers to invert the nodding direction.
- Angle deviation -- How tolerant the automatic aiming should be. Default is 5.0.
- Decrease it to aim precisely but slowly.
- Increase it to aim fast but sloppily.
Look for the following setting in the Control Panel of all of the Hinges, Rotors, and Pistons:
- Share Inertia Tensor
- Enable this on all upper mechanical blocks of the turret.
- But keep it disabled on the one Rotor/Hinge/etc. that is attached to the base or ship.
What's the automatic aiming range
When set to automatic, the small-grid CTC has a maximum AI Aiming Radius of 600 metres and the large-grid CTC has 800 metres. The distance that the projectile travels can be longer than that, and if the turret is locked on to the target, you have a chance of getting the full effective range of the turret weapon.
How to build space drones and guided missiles

A grid floating in zero gravity without a cockpit/remote control, but equipped with a turret controller, can rotate itself:
- Give it a static weapon and an AI target for aiming.
- Attach two orthogonal rotors (doesn't matter where), and assign one to CTC elevation and one to CTC azimuth.
- Attach a gyroscope to each rotor, and turn on Share Inertia Tensor in the rotors!
- Set the gyroscopes to an override of zero RPM.
If the grid now additionally has forward thrusters set to override, it will turn and fly towards its AI target.
Use the Set Up Action button to tell the drone what to do when it detects the target (fly and shoot) or loses sight of it (wait and stop wasting ammo), respectively. To trigger close-range actions, use a Sensor!
This shows how using Gyroscope Overrides to stabilise an AI Turret Controlled grid is useful when
- building guided missiles/Player Built Weapons
- building seeker drones that follow players.
Best Practices
In general, Turrets work most reliably on static grids (stations), and on mobile grids that are locked down (using landing gear, connectors, etc.) to the ground or to an asteroid. For a moving mobile grid, use gyroscopes to stabilise the turret. Heavy turrets on fast moving mobile grids have the worst automatic aim.
- If the AI controls a slow precise weapon (railgun or missile launcher) on a fixed station, decrease the Angle Deviation to make the AI shoot only at targets that are truly right in front of it. It will shoot less often, but with much higher precision.
- If the AI controls fast spray-and-pray gatling-style weapons on a mobile grid, it has to constantly re-aim to compensate. If the Angle Deviation is too low, the AI will never shoot, because the target is never "in front" of it long enough. Increase the Angle Deviation a bit to make the AI more tolerant to motion, at the cost of precision.
- Very massive Turrets need higher Velocity Multipliers to even get into gear, and may not be able to rotate themselves towards the target very precisely, so increase the allowed Deviation a bit. Light-weight turrets need lower Velocity Multipliers to be able to aim precisely, otherwise they over-/undershoot.
The same holds for civilian custom turrets used to control Block Tools:
- Drills, Welders, and Grinders are heavy and need higher velocity multipliers. Tools have a wide area of effect and can handle a much higher Angle Deviation than weapons.
- Spotlights and Cameras are light-weight, so lower the Velocity Multiplier. Lower the Angle Deviation to keep a much closer eye on the target.
Troubleshooting Tips
Q: Why is my manual mouse steering inverted? -- A: Likely you placed the Hinge or Rotor the "wrong" way round, which accidentally inverted your manual controls. You don't always need to dismantle everything, first try a negative value such as -9.0 for the Velocity Multiplier of the affected axis.
Q: I set the turret up on a base, why does the turret not move? / Why does the turret move my spaceship? A: In this case, make sure in the Control Panel Screen that you disable Share Inertia Tensor for the mechanical block that is directly attached to the station or ship. You do not want the turret to share the inertia of the whole base or ship!
Q: How do I tell whether a Turret is set up properly? -- A: Open the Control Panel Screen of the Custom Turret Controller and look at the info area on the bottom right side. It contains status information and helpful error messages, such as:
- ERROR: Missing elevation or azimuth Rotor/Hinge
- ERROR: Must have a linked Weapon tool or camera
- If it says "NOMINAL", that means you're good.
Run the "Targeting Info" script on an LCD panel for more information. It gives you helpful messages such as:
- Main Cockpit not set
- No locked target
Q: How do I test the turret AI without setting it to destroy my own grids? -- A: Click Add new enemy Identity in the Control Panel Screen of the Custom Turret Controller. It adds a virtual NPC to the game that you can make the owner of any dummy grid or decoy that you can use for target practice.
Tutorial Videos
- Splitsie's tutorial
- Scriptless Vanilla Auto Tracking Attack Drone (custom turret controller demo blueprint)
- How to make drones using the turret controller video by DaddyDamo
- Rover Drone Guide by Halipatsui
- Turret controller guided missile for vanilla space engineers by Evan
Related Workshop Scripts
The PARK script by Trekker provides similar but more advanced functionality: Instead of mouse control for two mechanical blocks, it lets you assign custom WASD keybinds to whole groups of pistons and rotors.
MArmOS (Mechanical Arm Operating System) is an advanced script with even more control features.