How to build warning lights
In your ship bridge, you may want a monitor with visual warnings that alert you when something important changes: Power is low, fuel is low, the ore cargo is full, an enemy approaches, the ammo cargo is empty, and many similar situations.
Example Build
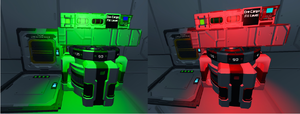
The following screenshot shows a simple small-grid cargo warning monitor built on a locked large-grid rotor:
- Left image: Low cargo = green light
- Right image: Full cargo = red light
Blocks used from left to right: Timer Block, Interior Light green, Interior Light red, Text Panel LCD, Event Controller.
Additionally needed blocks: Battery, a locked Rotor, Cargo Container (or which ever thing you want to monitor in your case).
Additional steps for large grid only
If it's a small grid ship, skip this and continue with the building steps.
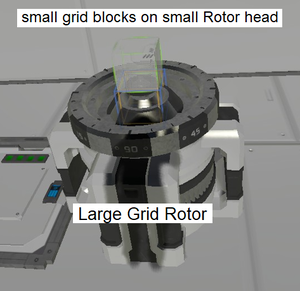
If you need a warning monitor on a large-grid ship or station, it's best to build the monitor in small-grid size and attach it to the large grid using a locked Rotor. We don't want this Rotor to rotate, we just use it as fixed "monitor stand."
Find a suitable spot for your "monitor stand" in your large-grid build, either embedded in the floor, the wall, or ceiling.
- Build a large grid Rotor. This is your monitor stand.
- In the Rotor's Control Panel, enable Rotor Lock.
- In the Rotor's Control Panel, click Detach.
- Make sure to grind down the large rotor head so it's out of the way.
- In the Rotor's Control Panel, click Add Small Head.
Now continue and build the small grid blocks on top of the small rotor head!
How to build a warning monitor
In the following example, we look at the "ore cargo full" case, but the same method also works for other events that the Event Controller detects.
Tip: Since you may build several rows of monitors, name each block after its purpose! Otherwise you will have difficulty telling them all apart.
- Build two Interior Lights.
- Set one light to green for "status okay" and one to red for "warning".
- Name the lights by adding "ore monitor red" or "green" to the name.
- Switch one light on and one off.
- Build a Timer Block.
- Name the timer by adding "ore monitor" to its name.
- Click Set Up Actions and, for both Interior lights, add their "Toggle Block on/off" action. Press ESC key to close the actions window.
- Set the Delay to 00:00:01.
- Press Trigger Now and verify that, when red is on, green is off, and vice versa.
- Leave it so green is on and red is off.
- Build a Text Panel or Corner LCD as a label so you remember what these lights are for.
- Name the LCD by adding "ore monitor" to the name.
- Set the LCD to Content: Text and Images.
- Click Edit Text and enter "ore cargo fill level"☆.
- Build an Event Controller to monitor the block's status and name it.
- Name the EC by adding "ore monitor" to the name.
- Set Event to Cargo Filled %☆.
- Set Condition to Equal or greater than☆.
- Set Threshold to 90%☆.
- Under Available Blocks, select the ore cargo container☆ to monitor, and click Add Blocks.
- Click Select Actions. Select the Timer and add its "trigger now" and "Run" actions to the two slots.
☆ The steps marked with a star depend on what you want to monitor, here, an ore container. But for example, if you wanted to monitor whether a tank is running dry, you'd choose Gas tank filled, equal or lower than, and add a tank in the EC.
How does it work?
The EC now monitors the cargo fill level of this container.
- If it exceeds 90%, the EC performs the first action, which is to toggle the lights, so green is off and red is on.
- If it falls below 90%, the EC performs the second action, which is ALSO to toggle the lights, and now red is off and green is on.
Trivia: Usually the EC action is to run two separate Timer blocks: One to switch the light on and do something, and one to switch it off and do something else. But we merely want to toggle a light, so we simplify and use only one timer block that toggles both lights. The EC however does not accept the same block action twice, so we cannot set up Timer>Run for both slots. That's why we use Timer>Trigger Now for the second (which also runs the block, the outcome being the same).
Are there better/further visible lights?
Do you find it hard to distinguish whether the Interior Lights are on or off in a lit room?
- Replace the interior lights with Text Panels with a red or green background colour, and toggle them on and off.
- Or if you have the DLC, replace the interior lights with one red and one green Light Panel; they are black when off and show their bright colour when on.
- Or if you have the DLC, and you want to depict two or more states in one block space, use
 Emotion Controllers.
If you need the warning lights to be visible very far, or even through walls, consider using named Beacons instead.
How to continue from here
You can, of course, build several rows of these monitors, each row with its own lights, detecting a different event: Cargo levels, tank filling, power levels, and so on. Check out what else the Event Controller can detect!
You'll notice that the Event Controller cannot detect enemies.
- To detect enemies at long-range, replace the EC in that row with a configured AI Defensive or Offensive block.
- Or as a short-range detector, such as indoors, use a configured Sensor block near the monitored area instead.
How can you ensure that a specific monitored cargo container contains all ammo, or all steel plates, or all ice, etc., so you can know whether you are running out? Use Conveyor Sorters!
You could also set up three coloured lights (high, medium, low), but it's a bit cumbersome. One event controller can only watch one threshold, and you need several to monitor a min/max range. Also you will need three Timers to toggle one light on and the other two lights off.
Workshop
Download Arstraea's ONYX - Computer block from the Steam Workshop to study a variant of this approach. This example houses Sensors, Programmable Blocks, Lights, Sound blocks, Buttons, and Timers. To attach to the large-grid ship, it uses Connectors instead of Rotors.


